
How to Create Amazon Listing in 2024: A Complete Guide
Crafting an Irresistible Amazon Product Listing to Captivate Customers
In the vast and bustling marketplace of Amazon, where millions of products compete for the attention of discerning customers, crafting an irresistible product listing is nothing short of an art.
In this digital age, your product listing serves as the virtual storefront, the first impression, and the persuasive sales pitch all rolled into one. It is the critical gateway to capturing the hearts and wallets of potential buyers.
With countless options just a click away, your Amazon product listing must not only stand out from the crowd but also captivate and convince customers that your offering is the best solution to their needs.
This guide will take you on a journey through the intricacies of crafting a product listing that not only grabs attention but also converts browsers into loyal customers.
What is a product listing page?
A product listing page (PLP) is a web page on an e-commerce website or online store that displays a list of products available for sale within a specific category or search result. It serves as an intermediary step between the website’s homepage or search results page and the individual product pages.
Key features of a product listing page typically include:
Product Thumbnails: Small images or icons of the products, often accompanied by product titles, prices, and brief descriptions.
Filters and Sorting Options: Tools that allow users to refine their product search by criteria such as price range, brand, size, color, and more. Users can also often sort the products by factors like price, popularity, or relevance.
Pagination: If there are a large number of products in the category, PLPs often include pagination to display a limited number of products per page, with links to additional pages.
Product Details: Basic information about each product, such as its name, price, availability, and a short description.
Call-to-Action (CTA) Buttons: Buttons or links that enable users to view more details about a specific product, add it to their shopping cart, or initiate the purchase process.
Thumbnails and Product Titles: Clickable links or images that lead to the respective product pages for more detailed information.
Navigation Elements: Links or breadcrumbs that help users navigate back to higher-level categories or the website’s homepage.
Visual Consistency: PLPs often maintain a consistent visual layout to make it easy for users to scan and compare products.
Responsive Design: Ensuring that the PLP is designed to work well on various devices, including desktops, smartphones, and tablets.
Relevant Information: Depending on the e-commerce site, PLPs may also include additional information such as customer reviews, ratings, and stock availability indicators.
How do I write an Amazon product listing?
Keyword Research:
Begin by conducting thorough keyword research to identify relevant and high-traffic keywords related to your product. Use tools like Amazon’s own keyword tool or third-party tools like Ahrefs, SEMrush, or Keyword Planner.
Access the Seller Portal at Amazon Central
Log in to your Amazon Seller Central account
Choose the Product Category/Subcategories
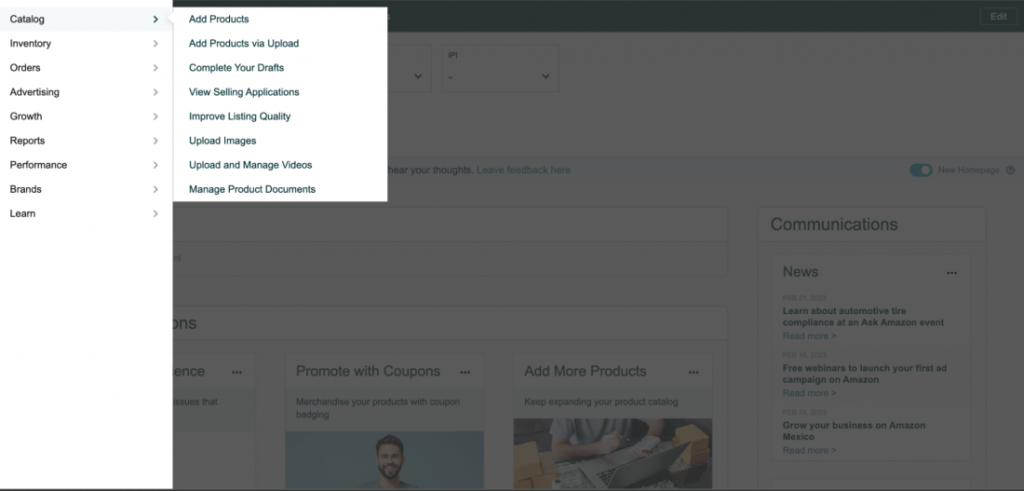
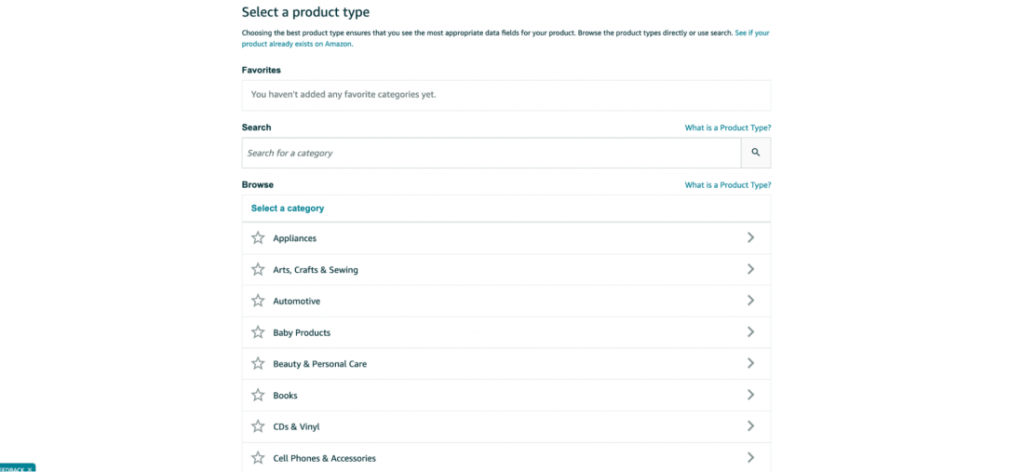
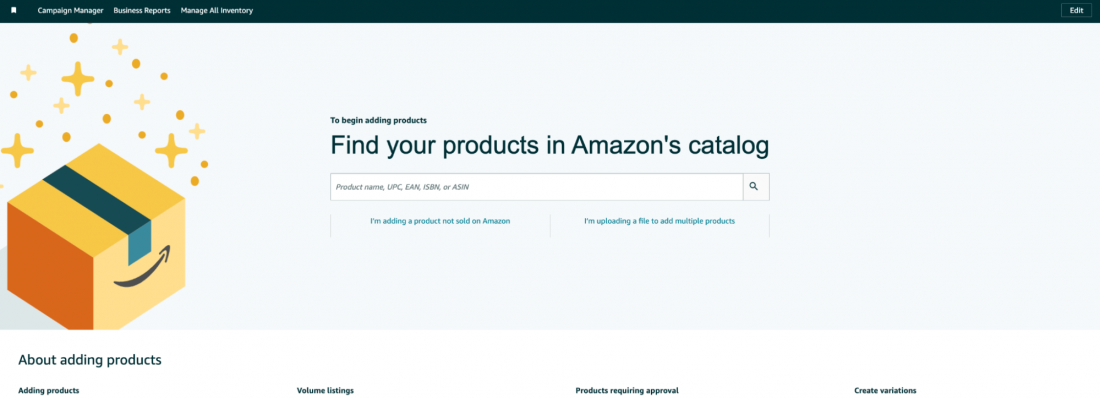
Navigate to the “Add a Product” section in Seller Central.
Select the most appropriate product category and subcategories for your product. Choose the category that best fits your product’s nature.
Fill in the Product Details

Under this section, you’ll need to provide comprehensive information about your product.
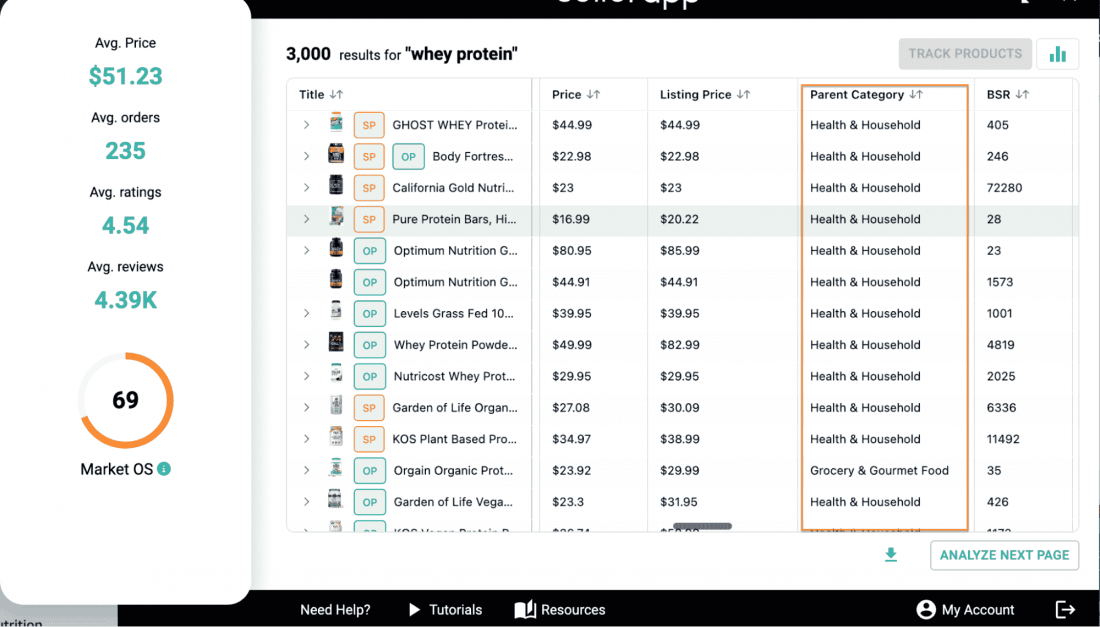
Go to Amazon, and search for your seed keyword. Next, open the SellerApp Chrome extension. You can see the categories with similar products in the “Product analyzer” tool.
Fill in the product information:
Now that categories are selected, it’s time to create the listing by filling up product details.
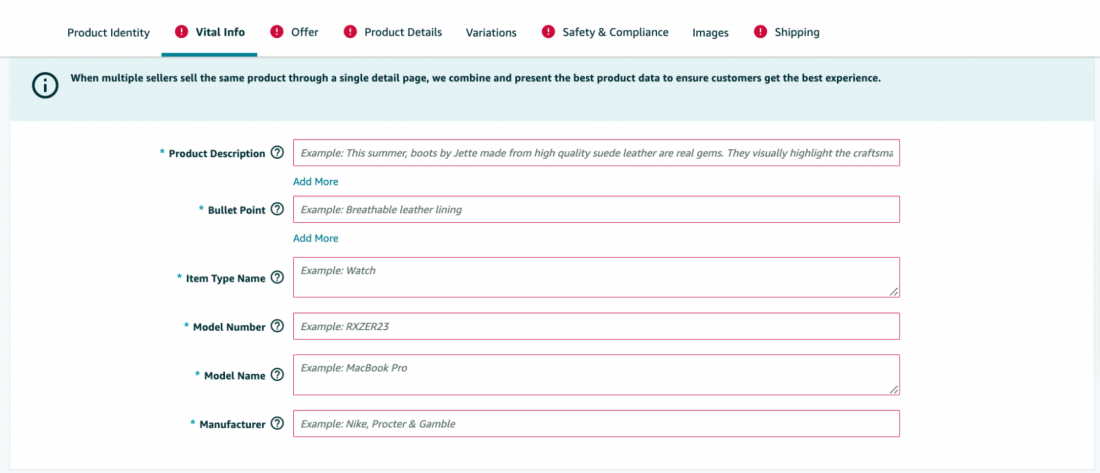
The listing information dashboard is divided into eight tabs:
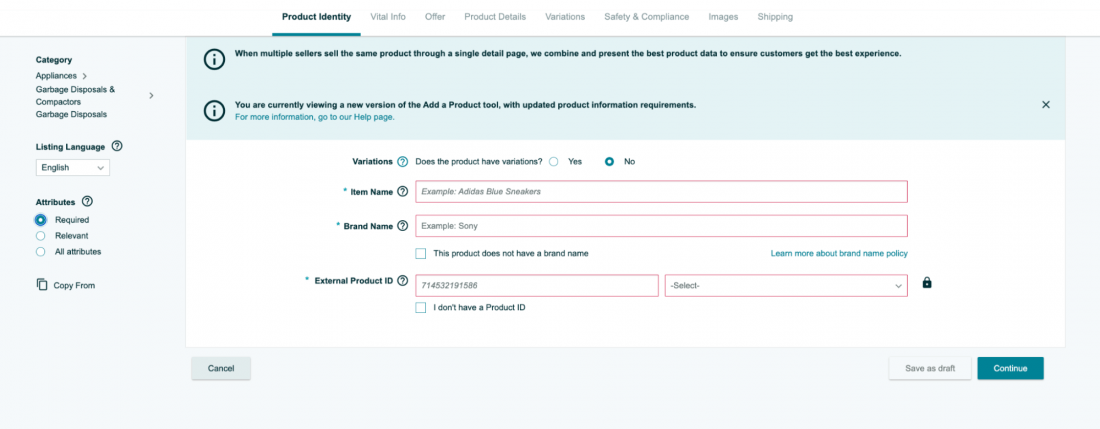
Product Identity
Vital Info
Offer
Product Details
Variations
Images
Keywords
Fill in the required details (indicated with red boxes) in all these tabs to create your product listing.
Product Information
Enter the product title: Make it clear and descriptive, including essential keywords.
- Make sure the product title matches the physical packaging of your product.
- Capitalize the first letter of each word except for prepositions, conjunctions, or articles.
- Keep the title detailed, with a keyword, brand name, at least one benefit, and other details if possible. The recommended title length is 80 to 200 characters.
- Use numerals like “2” instead of “two.”
- Don’t use non-language ASCII characters like Æ, ©, or ®.
- Don’t use promotional phrases like “Hot Item,” “Best Seller,” or Free shipping worldwide.
- Punctuation like hyphens, forward slashes, commas, ampersands, and periods are okay to use in titles.
- You can use abbreviations for measurements like “cm,” “oz,” “in,” and “kg.”
- Include the size and color variations in the product titles for your child’s ASINs
Note: Start the title with your brand name and your primary keyword, as Amazon will automatically generate canonical URLs based on the title you give.Brand Name
In this field, give your brand name. Amazon may ask you to provide evidence if the brand is not registered. You can submit images of your product and it’s packaging with your brand name.
External Product ID
Provide a distinct Product ID (UPC, EAN, etc.) in this section. These IDs are assigned to each item for effective product recognition.
A UPC code is required for sellers based in the USA, while those in Europe must provide an EAN number. You can get the codes from the GS1 portal.
If you’re a brand registered seller, add A+ content to your listing to make it more engaging to the shoppers.
A+ content can increase conversion rates and boost sales by providing a better understanding of the product and persuading customers to purchase.
This feature also presents an excellent opportunity for sellers to differentiate their products from similar offerings by competitors. Previously, differentiation was a significant challenge due to limited guidelines from Amazon.
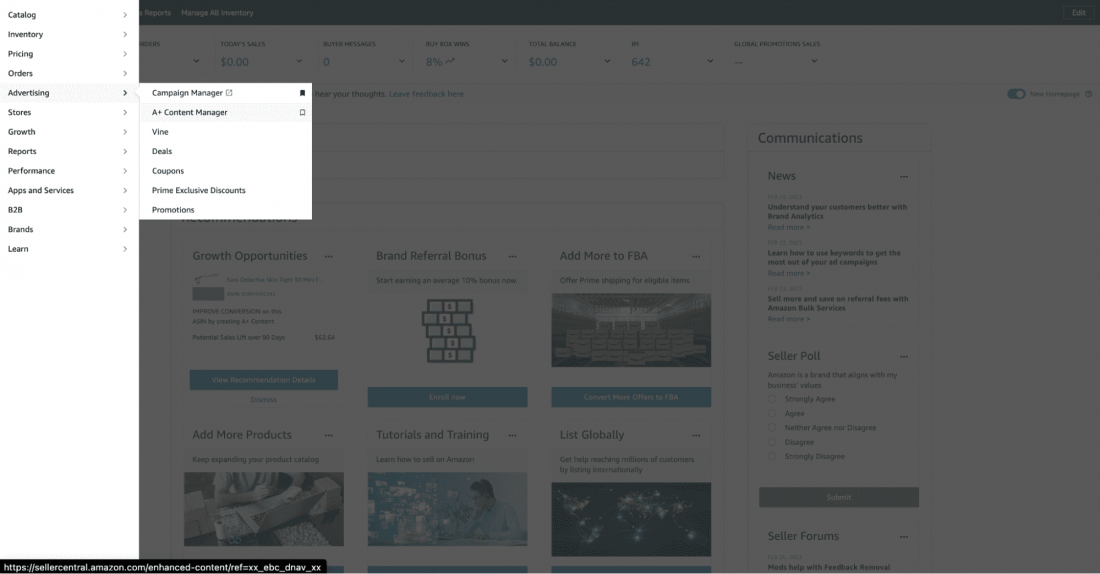
To create the A+ content, log In to your seller central account → Go to Advertising and click on A+ Content Manager.
Choose from the two options below:
- Basic: This option lets you create five modules of enhanced content to highlight your product features.
- Brand Story: You can create a brand story with a custom brand logo, picture, description, and frequently asked questions about your brand.
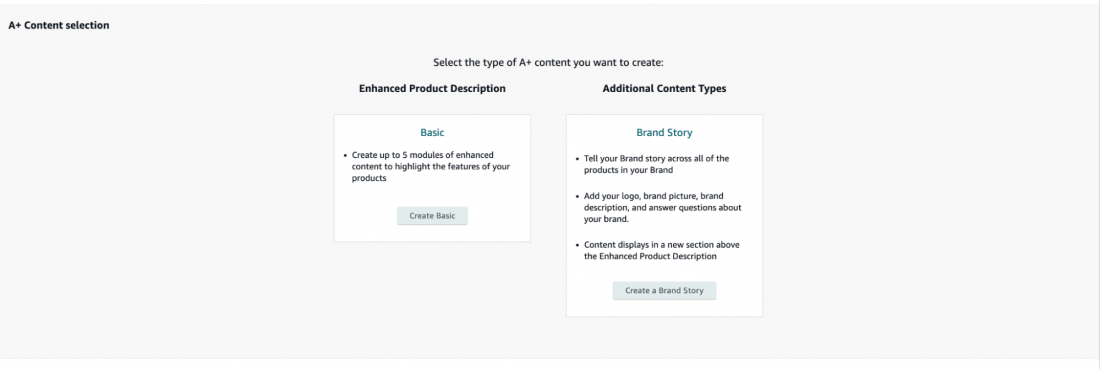
Select an option based on your goal, add the required modules, select the ASIN to apply, and submit it for review.
Amazon will review the A+ content within seven days and make it live on your selected ASIN’s listings.
Learn more about it from the detailed A+ content Guide.
Bullet points
Next, you must add bullet points to the Amazon product listing. These points appear next to the product images and describe your product benefits in detail. You can use relevant keywords in these bullet points to improve your product ranking in the search result.
Here are some more tips for creating the bullet points:
- Start each bullet points with a capital letter.
- Sellers can add five bullet points, and vendors are allowed to add ten bullet points.
- Write as sentence fragments, and do not use ending punctuation.
- Describe five features and benefits of your product in the bullet points
- Ensure all the bullet points have a similar length, not too long or short.
- Avoid using promotional content, discounts, and offers in the bullet points
- Don’t use HTML or other coding elements to create fancy symbols or emojis in the bullet points.
Item type name
Here, give a one or two-word phrase that best describes your product in general. For example, if your product is an organic blackhead removal mask, you can just mention Skin Care.
You still have three more fields to fill up.
- Model Number
- Model Name
- Manufacturer
Simply refer to the manufacturer’s provided information to find the model name and number. Lastly, be sure to give the name of the manufacturing company accurately.
Note: Remember that the vital information required for listing will change based on the selected product categories.
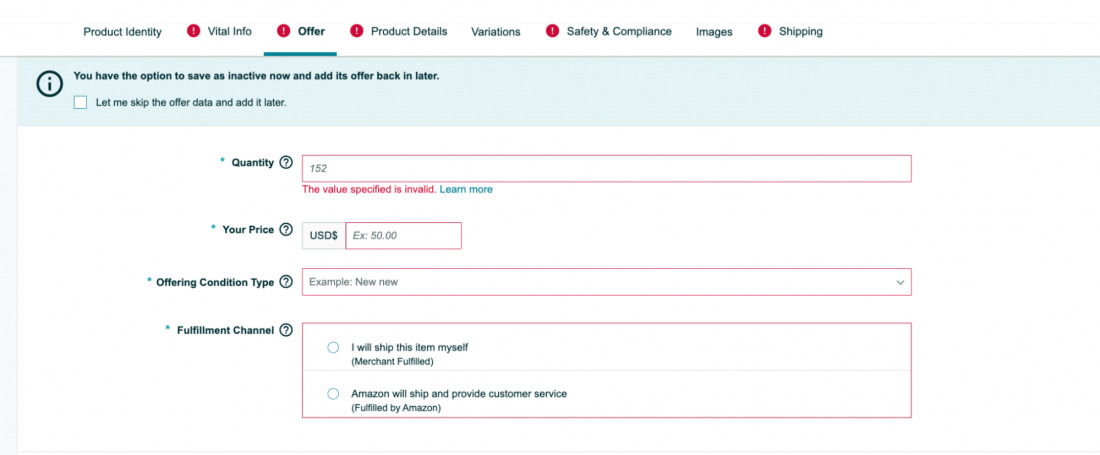
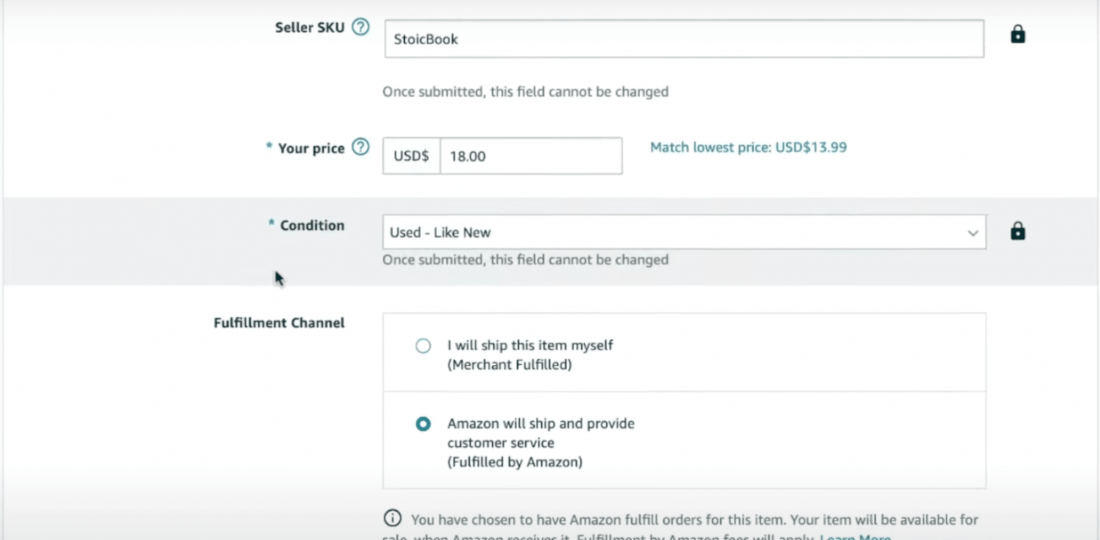
Fill up the offer details.
In the offer tab, provide the following information:
Quantity: Enter the number of items you wish to make available for sale.
Price: Determine the product price for sale. Start with a higher price, gauge the response, and adjust later.
Condition: Choose the product’s current condition that you intend to sell- new, used, or otherwise.
Fulfillment Channel: Now, it’s time to choose the order fulfillment method. This determines if you will be listed as an Amazon FBA or FBM seller. You have two options:
- Fulfilled by Amazon: Amazon takes care of all the shipping and customer service in exchange for a small fee.
- Merchant Fulfilled: You handle shipping and customer service yourself.
Fill up the Product details.
In the product details tab, fill up details about your product bundle, for example:
- Number of items: Give how many items you’re selling under each unit
- Color: Provide what’s the color of the product
- Included components: Specify the components included in the product.
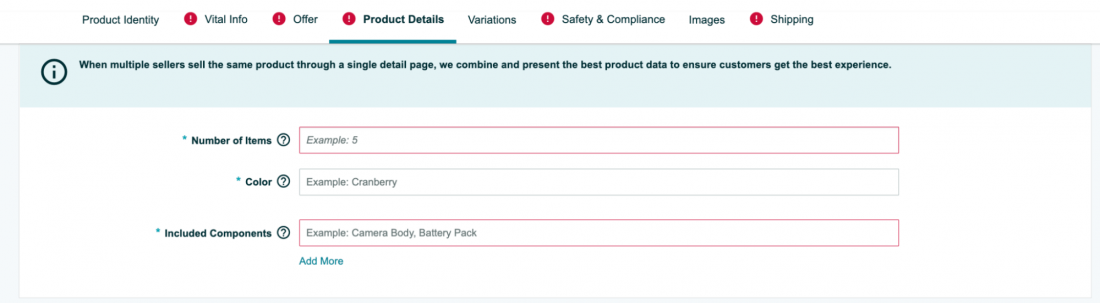
Note: Similar to vital information, the required information for Product Details will change for different product categories.
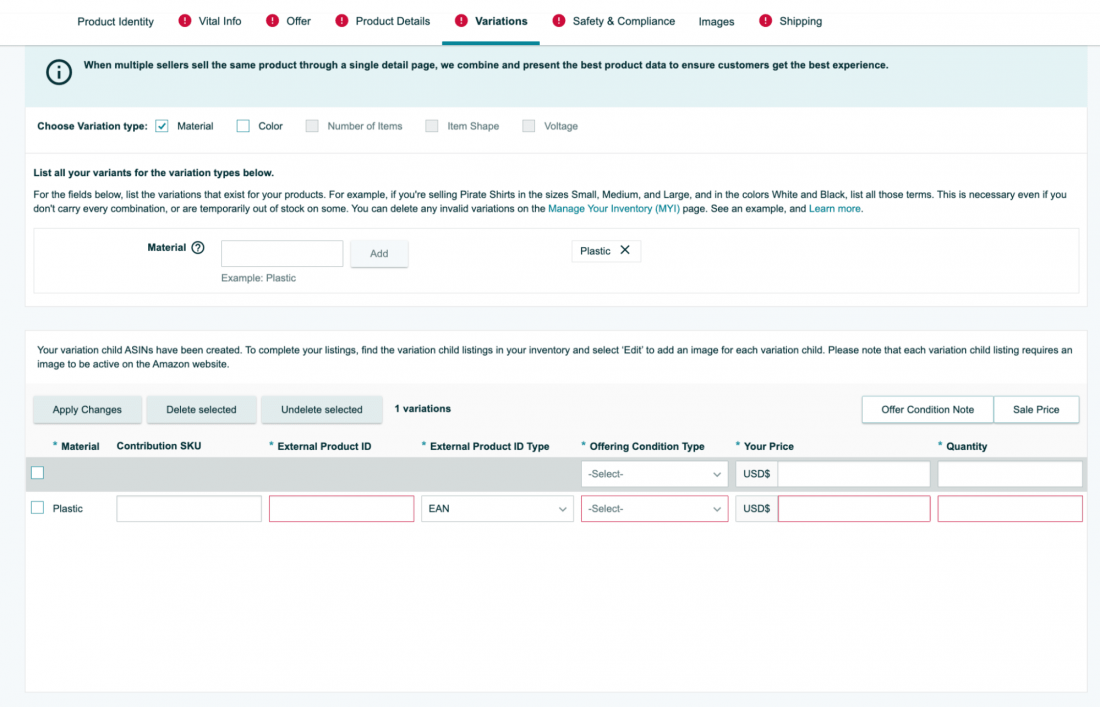
Add Variations
Only make changes in the “Variation” tab if you’re selling multiple variations of your product, such as different colors or sizes, materials, etc. This section allows you to add specific details for each variation, which allows you to organize and manage them seamlessly.
The options in variations will be different based on different categories. To simplify the process, here are some variations you’ll find on Amazon in general:
- Color
- Size
- Number of items
- Material
Similar to product details, for each variation, you need to add the following details:
- Product ID
- Offering condition
- Price
- Quantity
Add Product Images
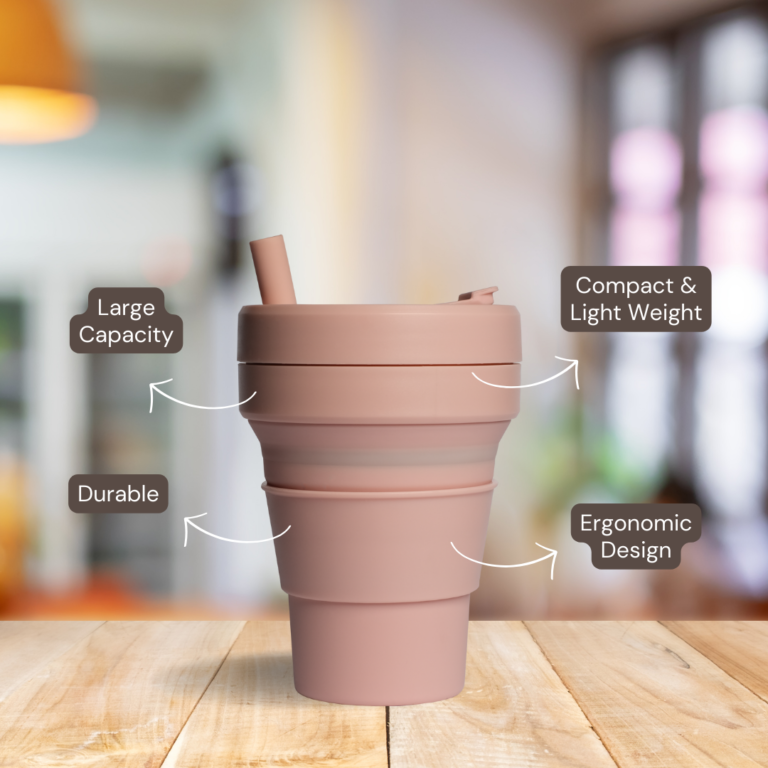
Images for your Amazon listing are extremely important. Customers can visually evaluate and compare different features of the products with the images.
Add multiple images in the listing that show the product in use from various angles, and highlight different features, to help shoppers make informed decisions.
Here are some tips for adding product images:
- Every detail page must have at least one product image. However, aim for six images and one video in the listing for optimum results.
- Ensure the images are clear, informative, and appealing to the eyes.
- Keep the image background white and ensure the product occupies at least 85% of the image space.
- Keep the image dimensions as 500 x 500 or 1000 x 1000 pixels to ensure optimum quality.
You can also evaluate the image qualities by asking the following questions:
- Does the image match the product description in size, color, and accuracy?
- Is the product recognizable in the image?
- Is the photo a high-resolution photograph, not a drawing?
- Was the photo taken at a flattering angle?
- Is the product focused and well-lit?
- Are close-up shots free from highlights or shadows?
- Does the image show the entire product?
- Is the background simple and clean?
Add Keywords
In the “Keyword” tab, fill up the following two fields:
- Target Audience: Enter your target audience for the product.
- Subject Keywords: These are the most important field in your listing. These are also called backend keywords. These keywords improve the discoverability of your products and allow you to create a readable product listing while ensuring the listing is indexed for all the relevant keywords.
Here are some tips to add these subject keywords:
- Use only generic words
- Include synonyms, abbreviations, and alternative names for your product
- Add only six keywords
- Enter phrases in a logical order of search
- Include applicable spelling variations, but avoid common misspellings
- Use all lowercase letters and skip punctuation such as hyphens and colons
- Avoid repeating words
- Avoid stop words like “a,” “an,” “and,” “by,” “for,” “of,” “the,” and “with.”
- Use singular or plural, but not both.
Furthermore, check our Amazon backend keyword guide to learn more about these keywords.
Save and launch
That’s it! You’ve successfully added all the information. Now it’s time to review it, and hit the “Save and finish” button to create your product listing.
Next, let’s see how to create product listings on Amazon in bulk.
Write a product description: Highlight key features and benefits.
Specify the brand, manufacturer, and any other relevant details.
Offer
Set the product price.
Enter the quantity available.
Set fulfillment options (FBA or FBM).
Product Features
List the key features and advantages of your product in bullet points.
Emphasize what sets your product apart from competitors.
Variations
If your product has different variations (e.g., size, color), add them here.
Include unique details for each variation.
Images
Upload high-quality images of your product.
Follow Amazon’s image guidelines for size, resolution, and background.
Keywords
Include relevant keywords in the “Search Terms” section.
Utilize relevant long-tail keywords to improve discoverability.
Save and Start
Review all the information you’ve entered to ensure accuracy.
Click the “Save and Finish” or “Save and Publish” button, depending on whether you’re ready to make the listing live immediately or save it as a draft for later.
Optimize and Monitor
After publishing, regularly monitor your product listing’s performance.
Make adjustments based on customer feedback and sales data.
Continuously optimize your listing by tweaking keywords, images, and product details to improve search visibility and conversion rates.
Manage Inventory
Keep track of your inventory levels and restock as needed to avoid running out of stock.
Use Amazon’s inventory management tools to streamline this process.
Remember that creating an effective Amazon product listing involves ongoing optimization and marketing efforts to attract potential buyers and convert them into customers. Stay updated with Amazon’s policies and best practices to ensure your listings remain compliant and competitive.
How can I list items in bulk on Amazon?
To list items in bulk on Amazon, you can use their Bulk Listing Tool or third-party software that integrates with Amazon’s seller platform. Here are the general steps:
Amazon Seller Account
Ensure you have a seller account on Amazon. You can choose between an Individual or Professional account, but for bulk listing, a Professional account is usually recommended.
Let’s see how!
1: In the “Add Product” page in Seller Central, choose the “I’m uploading a file to add multiple products” option.
2: Download the excel template based on your requirements. Amazon provides you the templates for the following situations:
- List products already in Amazon’s catalog
- List products not currently in Amazon’s catalog
- Update price & quantity
- Update product details
- Not sure if the products are in Amazon’s catalog
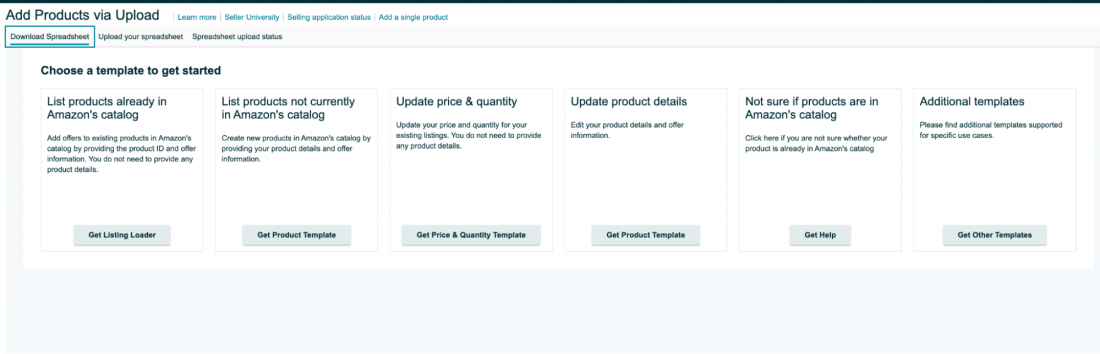
3: Select the option relevant to your requirements, choose the product category, and generate a template.
4: Once the template is downloaded, fill in all the columns and upload the spreadsheet to the Seller Central dashboard.
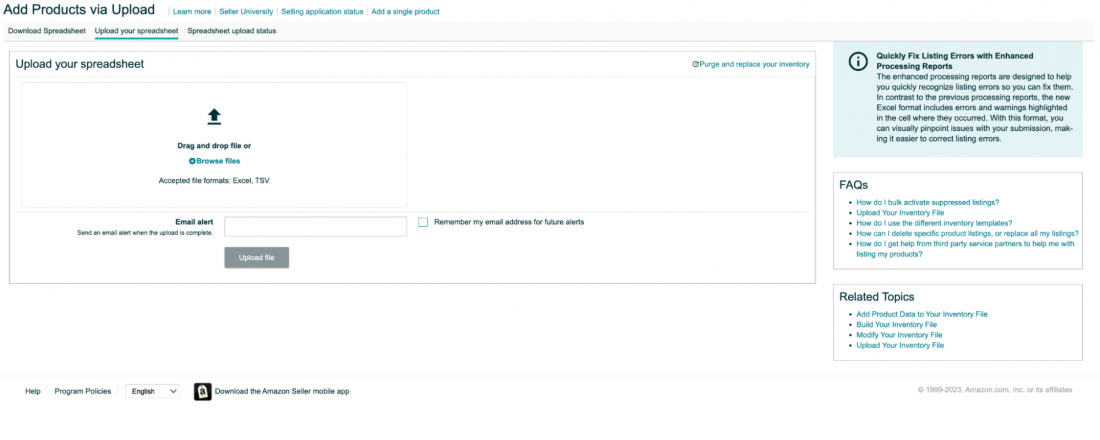
5: You can also check the upload status of your products from the “Spreadsheet Upload Status” tab.
Prepare Product Data
Organize your product data in a spreadsheet format, such as CSV (Comma-Separated Values) or Excel. Include information like product titles, descriptions, prices, quantities, SKUs, and UPC/EAN/ISBN codes.
Use Amazon’s Bulk Listing Tool
- Log in to your Amazon Seller Central account.
- Go to the “Inventory” tab.
- Select “Add Products via Upload.”
- Choose the category for your products.
- Download a template or use an existing template.
- Fill in the template with your product data.
- Save the file and upload it to Amazon using the Bulk Listing Tool.
Review and Submit
Amazon will process your bulk listing file. Review the summary to ensure there are no errors or warnings. If everything looks good, submit the listing.
Monitor Listings
After submission, keep an eye on your listings to make sure they are active and displayed correctly. You can also update product data in bulk by re-uploading modified files.
Optimize Listings
Once your products are listed, consider optimizing your product listings with high-quality images, detailed descriptions, competitive pricing, and effective keywords to attract potential buyers.
Fulfill Orders
Be prepared to fulfill orders promptly when customers make purchases. You can choose to fulfill orders yourself (FBM – Fulfillment by Merchant) or use Amazon’s fulfillment services (FBA – Fulfillment by Amazon).
Customer Service
Provide excellent customer service, including timely responses to inquiries and addressing any issues that may arise with orders or returns.
Remember that Amazon’s policies and procedures may change over time, so it’s essential to stay updated with their seller resources and guidelines.
How should an item that is currently on Amazon be listed?
Listing a product that already exists on Amazon is a straightforward process. Whether you’re a seller or just want to create a new listing for an existing product, you can follow these steps to get started:
1: Head over to the “Add products” page on Seller Central. Search for the product you want to list by the product name, UPC, EAN, ISBN, or ASIN number.

2: Select the condition of your product, whether it’s new, used, or refurbished.
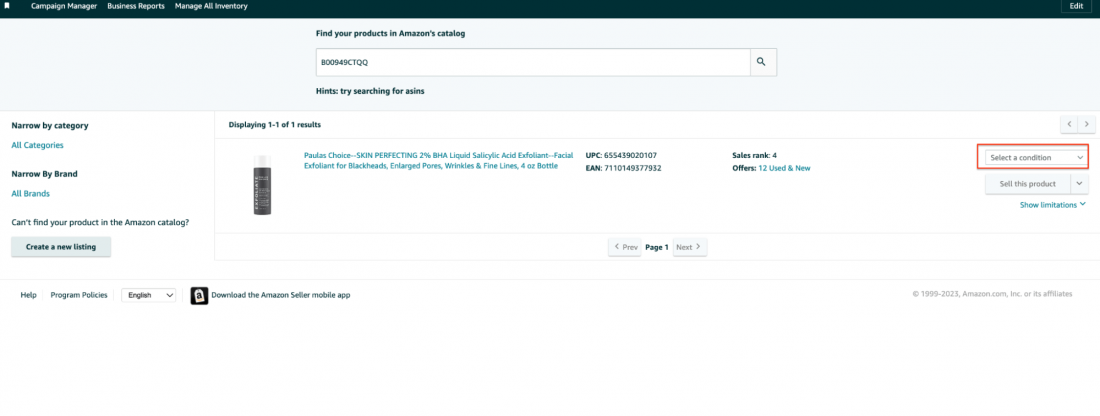
3: Click “Sell the product” to go to the listing backend.
4: Lastly, enter the selling price, select the product condition, choose the fulfillment method, and then hit “Save and complete” to create your product listing.
1. Amazon Seller Account:
If you’re not already a registered seller on Amazon, you’ll need to sign up for a seller account. You can choose between an Individual or Professional account, depending on your selling volume and needs. The Professional account has a monthly subscription fee but provides access to more features.
2. Research the Product:
Before listing your product, research it thoroughly. Ensure that the product you want to list already exists on Amazon and is not a restricted or prohibited item. You can use Amazon’s search bar to find similar products and analyze their listings.
3. Product Identifier:
Every product on Amazon must have a unique product identifier. Common product identifiers include UPC, EAN, ISBN, or ASIN (Amazon Standard Identification Number). If the product you want to list doesn’t have an ASIN, you may need to apply for a new one through Amazon.
4. Create a New Listing:
Log in to your seller account and go to the Seller Central dashboard.
Click on “Inventory” and then select “Add a Product.”
Enter the product’s identifier (ASIN, UPC, EAN, etc.) into the search box. If Amazon recognizes the product, you can proceed to create a new listing.
If the product isn’t recognized, you’ll need to provide additional information, including product title, brand, manufacturer, and other relevant details.
5. Product Information:
Fill in all the required product information accurately. This includes the product title, brand, manufacturer, condition (e.g., new or used), price, and quantity available. Make sure your product description is clear and enticing.
6. Images:
Upload high-quality images of your product. Amazon has specific image requirements, such as a white background and specific image dimensions. Follow these guidelines to ensure your product images meet Amazon’s standards.
7. Product Variations (if applicable):
If you’re listing a product with variations (e.g., different sizes or colors), you can add them under the same listing. This allows customers to select their preferred variation when making a purchase.
8. Pricing Strategy:
Set competitive pricing for your product. Research similar products’ prices on Amazon to determine a competitive yet profitable price point. Consider factors like shipping costs and Amazon’s referral fees when pricing your product.
9. Shipping and Fulfillment:
Decide whether you want to fulfill orders yourself (FBM – Fulfillment by Merchant) or use Amazon’s fulfillment service (FBA – Fulfillment by Amazon). If you choose FBA, you’ll need to send your products to an Amazon fulfillment center.
10. Review and Publish:
Carefully review all the information you’ve entered for accuracy. Ensure that your product listing complies with Amazon’s policies and guidelines.
Click “Publish” to make your listing live on Amazon. Your product will now be available for customers to purchase.
11. Monitor and Optimize:
Once your product is listed, regularly monitor its performance. Pay attention to customer reviews and feedback, and be responsive to any inquiries.
Consider running advertising campaigns to increase visibility and sales for your product.
12. Fulfillment and Customer Service:
If you chose FBA, Amazon will handle order fulfillment and customer service. If you’re using FBM, ensure timely shipping and provide excellent customer service to maintain a positive reputation.
13. Marketing and Promotion (Optional)
To boost sales, you can use Amazon’s advertising tools, such as Sponsored Products and Amazon Marketing Services (AMS), to promote your product within the Amazon marketplace.
14. Track Your Finances:
Keep track of your sales, expenses, and profits using Amazon’s Seller Central. This will help you manage your business effectively.
Why can’t I see new listing on Amazon?
If your new listing is not visible on Amazon, there could be several reasons for this issue. Here are some common reasons:
Incomplete Setup: Ensure that you have filled out all the required information for your listing, including product details, pricing, and shipping information.
Amazon Approval: Certain categories and products require Amazon’s approval before they can be listed. Check if your product falls into such a category and if you’ve obtained the necessary approvals.
Listing Review: Amazon may review and approve listings before they become visible. This process can take some time, so be patient.
Inventory Availability: Make sure you have sufficient inventory available for your listing. If your product is out of stock, it won’t be visible.
Pricing and Competitive Factors: Competitive pricing and the Buy Box algorithm can affect visibility. Ensure your pricing is competitive, and you’re following Amazon’s pricing policies.
Content Quality: Amazon may hide listings with low-quality images, inaccurate product descriptions, or policy violations. Review your content for compliance.
Seller Performance: Poor seller performance, including issues with order fulfillment, can impact visibility. Maintain good seller metrics.
Keywords and SEO: Optimize your listing with relevant keywords and ensure your SEO strategy is effective to improve visibility.
Geographic Restrictions: Some products may be restricted in certain geographic regions. Check if your product can be sold in the targeted region.
Technical Issues: Technical glitches or errors in your listing can also lead to invisibility. Review your listing for any issues.
Account Suspension: If your Amazon seller account is suspended, your listings won’t be visible. Resolve any account issues with Amazon support.
Amazon Algorithm: Amazon’s search and ranking algorithm can also affect visibility. Improving sales, customer reviews, and order fulfillment can help improve your ranking.
What should one do if an Amazon product gets removed?
Understand the Reason: Find out why your product was removed by checking your Seller Central account or email notifications. Common reasons include policy violations, intellectual property complaints, or product quality issues.
Review Amazon Policies: Familiarize yourself with Amazon’s policies and guidelines to ensure your product complies with their rules.
Resolve the Issue: Take necessary steps to address the specific reason for the removal. This might involve removing prohibited content, improving product quality, or resolving intellectual property disputes.
Appeal: If you believe the removal was a mistake or if you’ve resolved the issue, submit an appeal through Seller Central. Be concise, provide evidence of compliance, and follow Amazon’s appeal process.
Monitor and Communicate: Keep an eye on your Seller Central account for updates and respond promptly to any Amazon requests for information or actions needed to resolve the issue.
Prevent Future Issues: Take proactive measures to prevent future product removals by staying updated on Amazon’s policies, optimizing your product listings, and ensuring product quality and customer satisfaction.
Seek Professional Help: If you’re unsure how to handle the situation or need legal advice, consider consulting with an Amazon expert or legal professional who specializes in e-commerce.
How do I activate my listing on Amazon?
To activate your listing on Amazon, you need to follow these steps:
Log into Your Amazon Seller Account:
Visit the Amazon Seller Central website (sellercentral.amazon.com) and log in with your seller account credentials.
Access Your Inventory:
Once logged in, navigate to the “Inventory” tab. This is where you can manage your listings.
Find Your Inactive Listing:
In the “Inventory” section, you’ll see a list of all your listings. Locate the listing you want to activate. Listings that are inactive may be marked with a “0” in the “Available” column or labeled as “Inactive.”
Edit the Inactive Listing:
Click on the inactive listing you want to activate. This will take you to the listing details page.
Update and Save the Listing:
Review the listing details and make any necessary changes or updates. Ensure that all required information, such as product title, price, quantity, and product description, is accurate and up-to-date.
Check for Errors or Warnings:
Look for any error messages or warnings on the listing details page. These may indicate issues that need to be resolved before activating the listing.
Activate the Listing:
If there are no errors or warnings, and all the information is correct, you should see an option to “Edit” or “Activate” the listing. Click on this option to activate the listing.
Confirm Activation:
Amazon may ask you to confirm that you want to activate the listing. Review the confirmation message and click “Activate” or “Confirm.”
Wait for Activation:
Once you’ve activated the listing, it may take some time for it to become active on the Amazon marketplace. The exact time can vary, but typically, it should be live within a few minutes to a few hours.
Double-Check Your Listing:
After activation, double-check your listing to ensure that it’s live and visible to customers. You can search for your product on Amazon to confirm that it’s listed and appearing correctly.
Conclusion
In conclusion, crafting an irresistible Amazon product listing is a critical step in capturing the attention of customers and driving sales. By following the tips and strategies outlined in this guide, you can create a listing that stands out from the competition and compels shoppers to make a purchase.